Last time I gave an overview of working with LightZone, today I'm going to touch on the Styles, and for Black and White images in particular. To be honest, I can't always pre-visualize how an image will turn out before applying a Style, so a lot of times I apply one thinking it will work, only to undo it after. Once again, the non-destructive nature of LZ means my original image is unscathed.
So, what are Styles?
Styles are a set of predefined LZ tool stacks that enable amazing 1-click changes to your image. See the left of the screenshot from the last blog.
Need a Tone Mapped look? Use a Style. Want to simulate an image taken with infra-red film? There's a Style for that.
In addition. you can save your own edits as a Style and you can apply them to other images with one click. (as you can see, mine have horrible names like 'Style Number 1', really meaningful!)
A Worked Example
An example is the best way to learn, so let's create a Black and White image using Styles, and while we're at it, we'll look at the Crop and Straighten tools, something we never used last time.
Step 1 - Open a TIFF Image
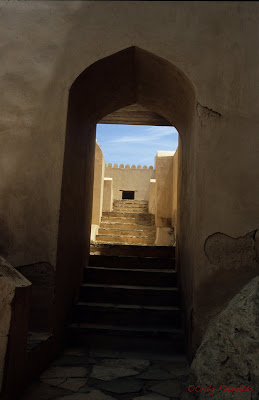
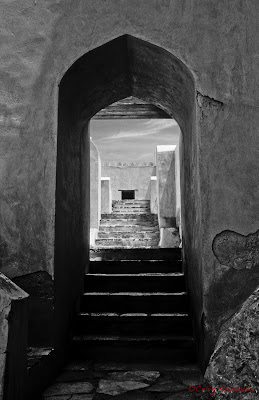
Unlike the prior blog that worked on RAW, this time it's a TIFF file scanned from a slide (remember those?) The image, taken at the beautiful Nizwa Fort in Oman, is nice but I want better tonality, I also want it black & white .. and it's skew!
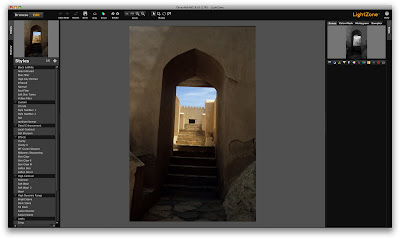
Step 2 - Straighten the Picture
I use the Rotate tool from the upper toolbar to straighten the image. When you click it a grid overlays the image, simply rotate the grid until the image is properly framed, hit enter and it's automatically cropped to fit. I find this especially useful in seascapes where you want a flat horizon, just align the horizon along one of the horizontal grid lines and you're done, easy! One point to note about the Rotate and Crop tools is that they're the only tools that are not on the tool stack (in fact, from what I can tell it's effectively one and the same tool,) so you can change the crop at any time. Non-destructive editing means that you can undo or change a crop even after saving your work (remember, the resulting file is not the original but contains a link to it.)
See, the toolstack on the right is empty.

Step 3 - Apply 'Soft Wow' Style
Right, so the prelim stuff is over, let's get down to the nitty-gritty of this blog and play with Styles! I want more detail in the shadows, better highlights and increased sharpness, I also want greater tonal separation on the plasterwork. A lot of work you say? Well, a single click of the mouse to apply Soft Wow, et voila! 'Soft Wow' is a two-tool stack that adjusts shadows, highlights, contrast and sharpness all at once and does it according to your specific image!
The underlying engine maps out the tonal range of the image and adjust the image accordingly.
The bottom tool is the same as the Relight tool and brings out shadow details, tames highlights and sorts out contrast. The second tool is the Sharpen tool to give cleaner details. If you're not 100% happy you're free to adjust any of the sliders in the tools as you see fit. A note of caution here: If you're unhappy with the effect a multi-tool Style has on your image, clicking Undo won't undo the Style, it will only undo the uppermost tool in the Style. To undo a Style you need to click Undo for each tool in the Style, not great but not a train smash either.
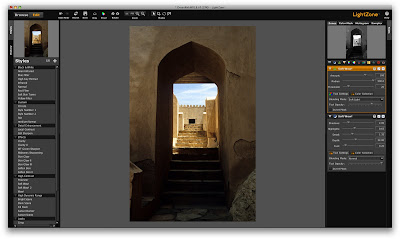
Step 4 - Apply Yellow Filter B&W Style
Like many photographs taken in the largely monochromatic Middle East, this would make a great black and white image. At the top of the Styles stack are a number of Black and White effects, from simple desaturation of colours to Styles that mimic the old Filters we used to use with B&W film (film? wazzat?) In this image I want the yellowish central stairs to stand out, so I'll try the 'Yellow Filter' B&W style. This Style mimics a 'yellow filter with B&W film' and so lightens the stairs. Unlike Soft Wow this is a single tool Style, so only one tool gets added to the stack.
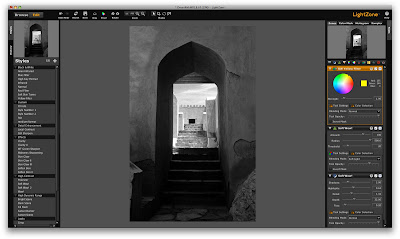
I think that'll do. So, we went from the image on the left to the image on the right in 1 straighten and 2 clicks! Photo editing this easy should be illegal (I think I'll copyright that slogan!)
For doing B&W images I use LightZone exclusively, I can't think of a better tool. Although this example did not use the Zone Mapper, the combination of Zone Mapper and B&W Styles mimics the way I think about creating my monochrome images (also a few here.)
There are a lot of things Photoshop does that LightZone doesn't, like panorama stitching, image overlays and all those painterly effects which I never use. LightZone covers 99% of my needs and I find it the easiest and most intuitive of all editing tools I've tried.
If you found this useful (or I made some awful blunder) let me know.
Craig
sunburnt ... and in need of a shave


We need more tutorials :), tx
ReplyDeleteArnaud
this is so inspiring, the ability to take a blunder and turn it into a masterful piece of art. thanks for the encouragement!
ReplyDeleteFound both your tutorials on LightZone to be very helpful. Now that there has been somewhat of a resurgence in LightZone activity due to the efforts of The LightZone Project open source developers might you be posting more tutorials as time
ReplyDeletepermits?
Hi, I've not really given much thought to a follow up tutorial. Seeing as you're asking I might do it. Is there anything specific you had in mind?
ReplyDeleteHow about something on the spot and clone tools? I am one of those that are new to LightZone due to it being mentioned recently on LifeHacker.
ReplyDeleteHi Brian, thanks for the suggestion. I'll give it a bit of thought and see what I can do. Keep watching.
Delete