Photoshop is, doubtless, the most widely used photo editing software, but it's a tool that seems primarily designed for graphic designers. I'm a photographer, not a graphic designer, and so I want a cost effective tool focussed on what I do, without a lot of extra bells and whistles that I'll never use. At under US$100, LightZone is that tool.
This will be a two part blog aimed at giving you an overview of how LightZone works, although I'm not an expert on it, mind you. While I evangelize LightZone amongst friends and family, the most common question I get is how to get started, lack of documentation and 'How-Tos' is a big weakness. But I think it's quite intuitive and have muddled my way through it for a while now, so I just thought I'd show you what I've learned.
LightZone does true non-destructive editing, the image is not altered and all edits are transformations applied to the original, resulting in a new image. When you save, LightZone creates a new file with all edits embedded, leaving your original untouched. So you end up with two files, the original image and a generated file which is your edited image. You can edit from RAW, JPEG, DNG or TIF files and it runs on Mac, Windows and even Linux. I use an iMac at home and an Ubuntu Linux laptop for work with LightZone on both.
Let's kick off with a quick tour, take a look at the screenshot below:
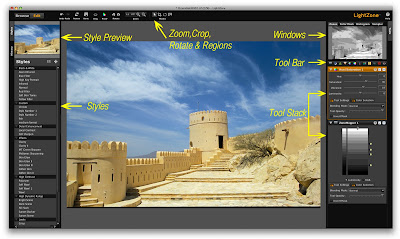
From left to right we see LightZone has
- pre-created styles to apply to your image, a fast way of doing edits and fixes. More on Styles in Part 2 of this blog.
- the Tool Stack, these are your edits. Here we have applied two tools, a Zone Mapper and a Hue/Saturation tool. LightZone applies the tools bottom-up, so it would first apply the Zone Mapper and on the result it would apply the Hue/Saturation. Changing the order of the tools (drag & drop) changes the outcome.
- above the tool stack is a bar containing the editing tools including the Zone Mapper, the Relight tool, Sharpen, Gaussian Blur, Hue/Saturation, Colour Balance, White Balance, Black&White, Noise Reduction, Clone Stamp, Spot Removal and Red Eye Reduction. Crop, Rotate and Region tools are on the main tool bar above the image.
- above the tool bar is set of tabs for the Zone Finder, Color Mask, Histogram and Sample windows. I rarely use a Histogram anymore, preferring the Zone Mapper and associated Zone Finder window.
The other premier tool is the Relight tool, one click and your photo's exposure is automatically adjusted, taming highlights and improving shadow detail.
A Worked Example
Here is a step-by-step example of editing a Nikon RAW image (.NEF)
Step 1 - Open In RAW
Open the .NEF file and LightZone immediately puts a RAW file adjuster at the start of the tool stack. (if you click on each of the images below you'll get a bigger version to allow you t follow more clearly.)
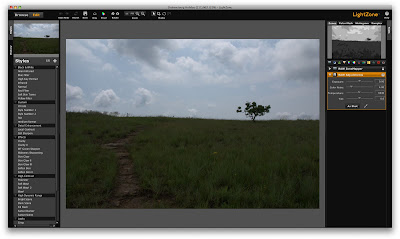
Step 2 - RAW Adjustments
I lighten the under exposed image a bit by using the RAW Exposure slider, leaving Temperature and Tint unadjusted. To be honest, I rarely use the RAW adjustment and usually just dive straight into adjusting things with the other tools, but I thought it would be nice to show this capability.
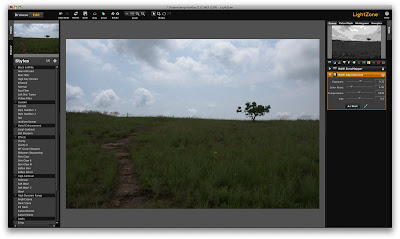
Step 3 - Relight
A Relight tool will further lighten the darker parts of the image and tame the highlights. Relight has the capability of rescuing badly underexposed areas of your image while still keeping the highlights under control, all with a single click. Relight is interesting because, as far as I can tell, it actually analyzes each individual image and adjust accordingly, in other words it's not just a generic tool but takes each image's exposure into account. Notice how the darker sections have been lightened but the highlights have not been blown out.
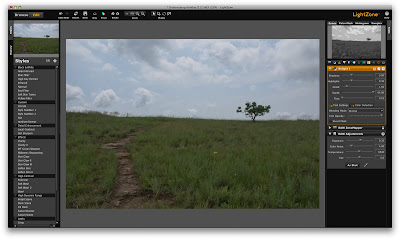
Step 4 - Increase Foreground Contrast
Add a Zone Mapper. On its left are 16 exposure levels, from pure white to pure black. The wider band of zones represent those in the actual image. The mouse is positioned at the 8th zone down and all areas of the image corresponding to this zone are shown in yellow in the upper Zone Finder window. As your mouse moves across the zones different areas light up in the Zone window. I increase contrast by dragging the 11th zone down, mapping it to black, and dragging the 6th Zone upwards. LightZone does not have the concept of layers, adding a region mask limits this contrast increase to the foreground, leaving the sky and clouds unchanged. Changing the area between the inner and outer lines of the region changes the feathering, the smaller this area the more dramatic the change. By extending the region mask beyond the image boundaries I ensure the whole grassy area is affected.

Step 5 - Increase Sky Contrast
To adjust the contrast in the clouds independently of the foreground I use another Zone Mapper, but this time draw a region around the sky. I've decreased the overall exposure of the sky by moving all the zones down, but have increased contrast by pulling the lower zones further down than I did for the upper zones. Notice that I have no pure whites anymore because I've dragged the uppermost (lightest) zone down, mapping those areas of the image to a slightly darker zone. I also located the darkest bit of cloud in the image and dragged it's corresponding zone downwards. The clouds now have better tonality and a stormy, foreboding look.
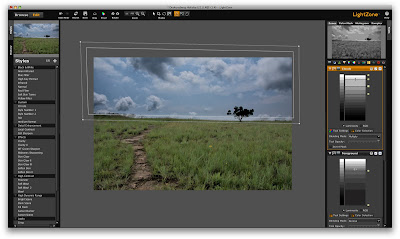
Step 6 - Adjust the Earth Colours
The pathway leads your eye into the image and so I wanted it to stand out, but subtly. Also, because I shoot in RAW, the colours are not very saturated, a trait of the Nikon digital sensor. So to increase the brown colour of the path I use a Hue/Saturation Tool, adjusting the Saturation and Vibrance until I like the look. Easy does it, I want to avoid too much of an unnatural look. The tool normally increases the saturation of all colours so to limit it to earth tones I used the tool's Color Selection tab and clicked the eye dropper tool in the pathway to select just the brown tones.
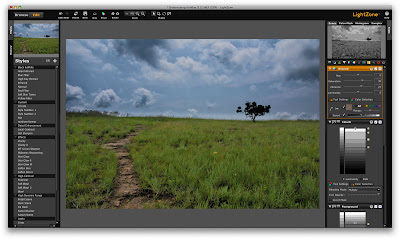
Step 7 – Bring out the yellows
Lastly, on the day I took the picture I was particularly aware of how the yellow flowers stood out in the afternoon light, but this was not evident in the image, so I wanted the yellow flowers to stand out as I remembered. Adding another Saturation Tool, this time clicking the eye-dropper on the yellow flower, and increasing the Luminosity, Saturation and Vibrance made the yellows really pop!
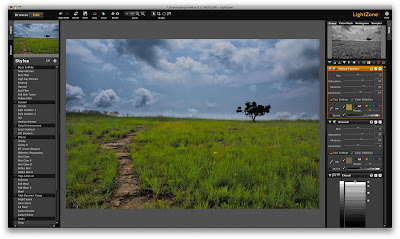
And we're done! Saving leaves the original file untouched, creating a separate JPEG with the tool stack and a reference to the original file embedded. Open the edited file later and the tool stack is there, ready for further editing or even changing any previous edits.
So, that's 7 simple steps to go from the this picture, straight of the sensor:
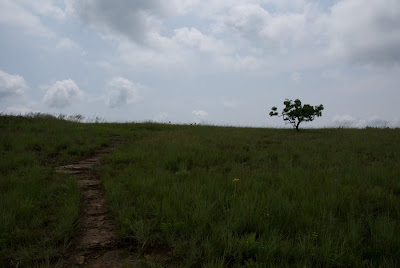
to this, more atmospheric, picture:
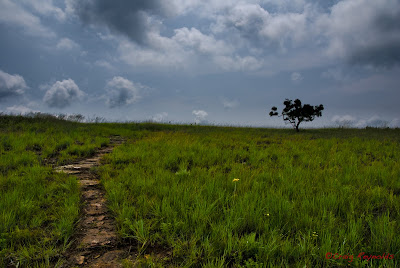
This whole process took me under 5 minutes to do and sounds lot more complicated than it really was. You can see a full size version here.
Most of the images on my site have seen some LightZone work, from a minor saturation change to some advanced editing. I use it for 90% of my editing and particluarly like it for Black & White work.
If you've found this helpful please let me know, I'd also appreciate feedback from those with a bit more experience than me. I still have plenty to learn.
Oh, before I forget ... if you intend editing from RAW files just make sure LightZone supports you camera's version of RAW, it's not always that up to date.
In the next post I'll cover Styles and how they make quick editing (almost) effortless.
Craig
sunburnt ... and in need of a shave


A very useful and beautifully written summary.
ReplyDeleteI wish more people start wondering about this really powerful and intuitive photography tool.
I am simply in love with it :)
I hope you offer more in this vein...
Regards,
Bulent
Another LightZone afficionado
This comment has been removed by a blog administrator.
ReplyDeleteWell done and much needed! Please share more with us.
ReplyDeleteCheers,
Bob
This has been a very helpful article in two ways. You did a nice job providing an overview that summarizes the technical use of LightZone. It motivates me to patiently move forward and learn how to use this product.
ReplyDeleteMoreover, by discussing your artistic and perceptual objectives in making changes, you provide insight into important fundamentals of creating fine art images.
Thank you very much.
LeeJ
Excellent introduction to LightZone - thanks for taking the time to write & post it
ReplyDeleteFine job, Craig. Plain, informative descriptions and nice pictures.
ReplyDeleteHere is an interesting idea, for some of your works, publish on your blog the tool stacks you used to create the final images, along with the beginning and ending pictures. Don't even need any descriptions of how you did it.
I think that would really help folks, as I tend to learn best by seeing (and doing of course).
Hopefully, for a handful of shots in each of a few categories (B&W, High contrast, etc., or how ever you want to break them out), it wouldn't even take you much time or effort.
What do you think?
Jeff Smith
Marietta, GA USA
Thank you for that utterly useful intro to LZ. I love this software and have been using linux for years it's the tool! LZ is an awesome product and your intro was the missing part for me to use it. Many thanks.
ReplyDeleteArnaud
Canada
Arnaud, thanks for the positive feedback. I have mine installed on my Mac and a Linux box too (I use Ubuntu.)
DeleteGood work, thank you ;)
ReplyDeleteThank you Diana, I'm glad you found it helpful.
DeleteThank you for your informative tutorial. I have 50yrs experience with film, and am just now beginning to transition to digital. Photoshop was too pricey and complicated and LightZone looked like a much better alternative for a Photographer who has no desire to be a Graphic Designer. Thanks again for the training.
ReplyDeleteExcellent, thanks. I'm just getting into LightZone and learning materials are still thin on the ground. I find this so much easier to follow than a video!
ReplyDeleteCheers!
Just ran across this post today, and as a new Lightzone user, I wanted let you know that it's still helping people. Many thanks!
ReplyDeleteThis was really helpful, I was glad for it. I just made an account and so new to everything, Do you have an article on the walk through from sign up? (Nothin's showin' up for me to be able to load pics)
ReplyDeleteAwesome :) thanks. Love to see more
ReplyDeleteThanks Craig. I've finally found a product that I think even I can master, and your introduction has proved invaluable.
ReplyDeleteThanks again.
John
Bristol. U.K.